Highlights:
- Black mold can grow on walls, ceilings, and hidden areas, releasing spores that cause respiratory issues, allergies, and skin irritation.
- Early detection is critical; look for musty odors, dark patches, bubbling paint, and water stains.
- Proper preparation—including protective gear, ventilation, and containment—is essential before removing mold.
- Small infestations can often be treated with cleaning solutions, natural alternatives, and careful scrubbing, while porous or heavily infested materials may need removal or replacement.
- Dispose of contaminated items safely to prevent mold spores from spreading throughout your home.
- Maintaining low humidity, fixing leaks, and improving ventilation are key to preventing mold from returning.
- Professional help is recommended for large infestations, recurring mold, or cases involving health risks.
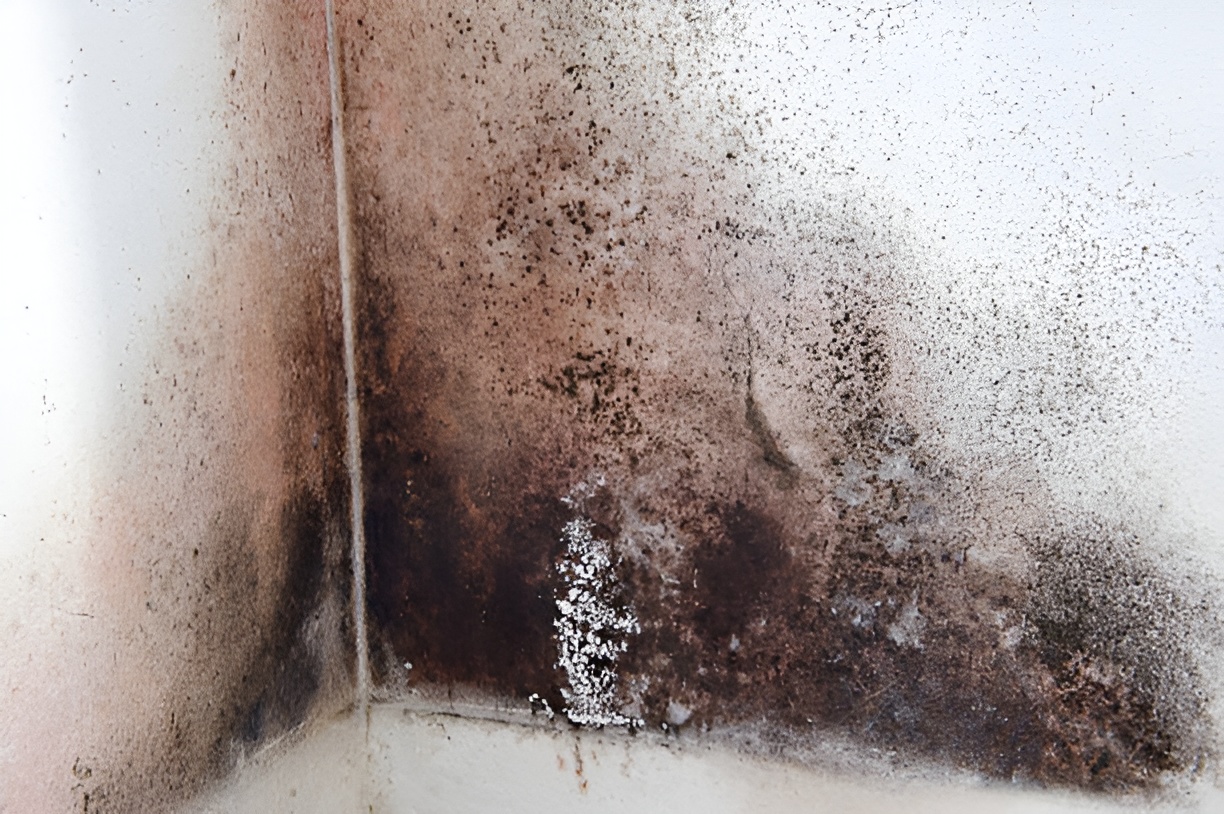
Black mold on wall is more than just an eyesore—it’s a health hazard that needs prompt attention. If you’ve noticed dark spots creeping along your walls or ceilings, it’s important to act fast. In this guide, we’ll walk you through how to identify, remove, and prevent black mold, ensuring your home stays safe and healthy.
What Exactly Is Black Mold and Why Is It Dangerous?
Black mold, scientifically known as Stachybotrys chartarum, thrives in damp, poorly ventilated environments. It’s most commonly found on walls, ceilings, or behind wallpaper where moisture is present. Unlike surface dirt, black mold releases microscopic spores into the air, which can trigger serious health issues over time.
Health risks include:
- Respiratory problems: Chronic coughing, wheezing, or shortness of breath.
- Allergic reactions: Sneezing, itchy eyes, and nasal congestion.
- Aggravated asthma or lung conditions: Even mild exposure can worsen symptoms.
- Skin irritation: Some people develop rashes or other dermatological reactions.
Early detection is key. Signs that black mold is present include:
- A persistent musty odor in poorly ventilated rooms
- Dark green or black patches on walls, ceilings, or behind furniture
- Water stains or bubbling paint
- Increased allergy or respiratory symptoms among household members
Identifying black mold early not only protects your health but also makes the removal process simpler and less costly.
How Can You Safely Prepare to Remove Black Mold?
Safety should always come first. Black mold spores are tiny and easily inhaled, so taking precautions is essential. Here’s how to get started:
- Protective gear: Wear gloves, goggles, and an N95 respirator or mask. Cover your arms and legs with long sleeves and pants to reduce skin contact.
- Ventilation: Open windows and doors, and use fans to direct airflow out of the home. Avoid circulating air back into other areas.
- Containment: Seal off the affected room with plastic sheeting or painter’s tape to prevent spores from spreading.
- Remove vulnerable items: Take out rugs, curtains, or furniture near the moldy area, as these can easily become contaminated.
- Minimize contact: Keep pets and children out of the work area to avoid exposure.
Proper preparation reduces the risk of spreading spores or developing health issues during cleanup.
What Supplies Will You Need?
Having the right tools makes mold removal more efficient and safer. Here’s a detailed list:
- Cleaning solutions: Mild detergent, white vinegar, or hydrogen peroxide. For tougher infestations, a diluted bleach solution can be effective.
- Spray bottle: Helps evenly apply cleaning solution to walls.
- Scrub brushes or sponges: Soft brushes for delicate surfaces, stiffer ones for textured walls.
- Disposable cloths or paper towels: To wipe away mold without spreading spores.
- Plastic bags: For safely disposing of contaminated materials.
- Optional: HEPA vacuum for cleaning up loose spores afterward.
For larger infestations, professional-grade products or remediation services may be necessary.
Step 1: Identify the Extent of the Mold
Before diving in, inspect the affected wall carefully. Check whether the mold is surface-level or has penetrated deeper into the material.
Look for:
- Bubbling or peeling paint – an indicator that moisture has infiltrated the wall.
- Soft or crumbling drywall – suggests the mold has weakened the material.
- Persistent musty smell – even after initial cleaning, this may indicate hidden mold.
If the infestation is extensive, don’t hesitate to call a professional mold remediation service. Large-scale black mold removal can be hazardous and requires specialized equipment.
Step 2: Test for Hidden Mold in Your Walls
Sometimes, black mold is not visible on the surface, but it could be growing behind walls or under paint. Testing for hidden mold can help catch problems early before they spread.
- DIY Moisture Test: Use a moisture meter to detect damp spots in walls or ceilings. Areas with unusually high moisture are likely breeding grounds for mold.
- Visual Signs: Bubbling paint, warping wallpaper, or peeling surfaces can indicate mold behind the wall.
- Professional Mold Testing: Certified mold inspectors can perform air and surface sampling to detect hidden mold species and concentrations.
- Infrared Cameras: Professionals sometimes use thermal imaging to spot hidden moisture behind walls without tearing them down.
Testing helps you address mold issues before they become a health hazard or costly repair problem.
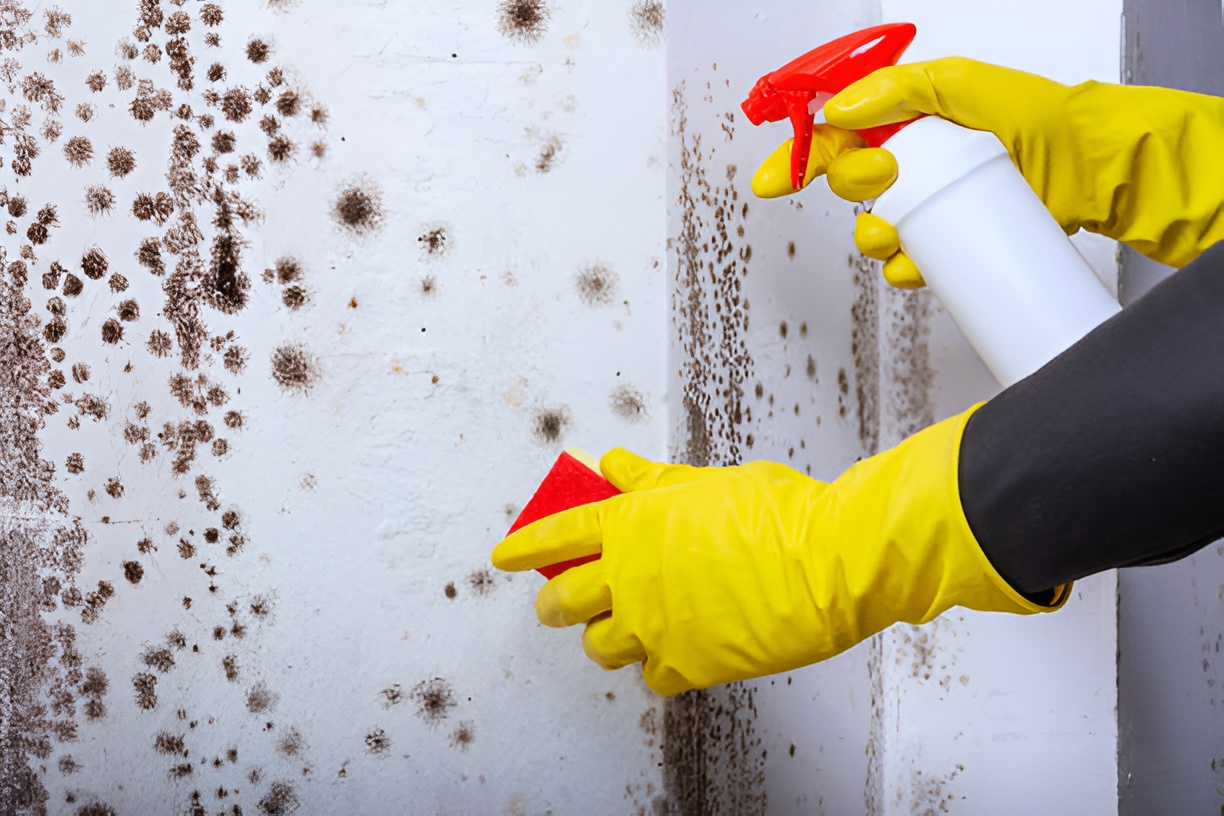
Step 3: Remove Surface Mold
For small patches of black mold on wall, follow these steps carefully:
1. Prepare your cleaning solution:
- One cup of bleach per gallon of water, or
- White vinegar undiluted for a gentler approach.
2. Spray the affected area evenly with the solution.
3. Let it sit for 10–15 minutes to kill the spores.
4. Scrub gently with a brush or sponge, focusing on visible mold.
5. Wipe the area clean with a damp cloth and allow it to dry completely.
Pro tip: Always scrub from the top down to prevent spores from falling onto already cleaned surfaces.
Natural Alternatives for Mold Removal
While bleach and commercial cleaners are effective, some homeowners prefer natural solutions. These can be safer for children, pets, and sensitive surfaces.
- White Vinegar: Undiluted vinegar can kill up to 82% of mold species. Spray on affected areas and let it sit for at least an hour before scrubbing.
- Baking Soda: Mix baking soda with water to form a paste, apply to moldy walls, then scrub gently. Baking soda also helps absorb moisture.
- Hydrogen Peroxide: A 3% hydrogen peroxide solution sprayed on mold can kill spores without harsh fumes. Allow 10 minutes of contact time before wiping.
- Tea Tree Oil: Known for antifungal properties, dilute a teaspoon of tea tree oil in a cup of water and spray onto moldy surfaces.
Natural options may require multiple applications but can be an effective, chemical-free solution for small infestations.
How Do You Handle Porous Materials?
Porous surfaces like drywall, wallpaper, and ceiling tiles can harbor mold deep inside, making removal trickier.
Here’s what to do:
- Cut out damaged sections: If mold has penetrated drywall, remove the affected pieces.
- Replace water-damaged materials: Old or damp materials are unlikely to be completely mold-free.
- Use mold-resistant replacements: For new drywall or paint, choose mold-resistant options to reduce the chance of future infestations.
Porous materials require extra care because mold can remain even after thorough surface cleaning.
How to Dispose of Contaminated Items Safely
Proper disposal is crucial to avoid spreading mold spores elsewhere in your home. Follow these steps:
- Seal contaminated materials in heavy-duty plastic bags.
- Avoid shaking or dropping items, which can release spores into the air.
- Clean the surrounding area with a disinfectant after removing items.
- Never leave moldy items sitting in the home or garage.
Taking these precautions ensures that your cleanup doesn’t inadvertently create a new mold problem.
How Can You Prevent Mold From Returning?

After successfully removing black mold on wall, it’s essential to take preventive steps. This is where preventing mold in your home becomes key. Consider these strategies:
- Control humidity: Use dehumidifiers or air conditioners to keep indoor humidity below 50%.
- Fix leaks promptly: Inspect roofs, windows, and plumbing regularly to prevent water intrusion.
- Improve ventilation: Exhaust fans in kitchens, bathrooms, and laundry areas help reduce moisture.
- Routine inspections: Regularly check damp-prone areas like basements, attics, and behind furniture for early signs of mold.
- Proper insulation: Insulate walls and pipes to prevent condensation, especially in cooler months.
A proactive approach helps avoid repeated mold outbreaks and protects your home and family over the long term.
Can Mold Appear During Renovations?
If you’re planning a home renovation project, it’s important to inspect for black mold before starting work. Mold can hide behind walls, under floors, or in crawl spaces, and ignoring it can have serious consequences:
- Increase renovation costs: Removing hidden mold later can be expensive.
- Health hazards: Mold spores may spread during construction, affecting your family and workers.
- Structural damage: Mold can weaken wood, drywall, or other materials, leading to costly repairs.
Inspecting and addressing mold prior to renovations ensures a safer, more efficient project.
How Mold Affects Home Insurance and Property Value
Black mold on wall doesn’t just pose health risks—it can also impact your finances and home ownership. Understanding this can help homeowners act promptly:
- Insurance Coverage: Most homeowners insurance policies cover mold only if it results from sudden water damage (like burst pipes). Slow leaks or long-term humidity issues may not be covered.
- Home Value: Visible mold can decrease your home’s resale value and discourage potential buyers. Mold remediation documentation is often required during inspections.
- Disclosure Requirements: When selling a home, many states require disclosure of any mold issues, even if already treated. Proper removal and documentation can prevent legal issues later.
Addressing mold early protects your family and safeguards your property investment.
Common Mistakes to Avoid When Removing Black Mold
Even experienced homeowners make errors that allow mold to return. Avoid these common pitfalls:
- Using bleach on porous surfaces, which may not reach deeply embedded spores
- Scrubbing without proper protective gear
- Failing to dry the area completely
- Ignoring the underlying moisture source that caused the mold in the first place
Avoiding these mistakes ensures your cleanup efforts are effective and long-lasting.
When Should You Call a Professional?
Sometimes DIY cleanup isn’t enough. Call a professional if:
- Mold covers more than 10 square feet
- There’s extensive water damage
- Household members have respiratory or immune issues
- Mold keeps returning despite proper cleaning
Professionals have the tools, expertise, and safety equipment to remove mold effectively and prevent regrowth.
Final Thoughts
Black mold on wall can feel overwhelming, but with careful preparation, the right supplies, and a strategic approach, it’s manageable. Removing mold safely and taking steps to prevent its return protects both your health and your home.
Remember, early detection, consistent maintenance, and proactive inspections are key. By keeping humidity in check, fixing leaks, and checking for mold before renovations, you can create a healthier, mold-free living environment for years to come.